Tags
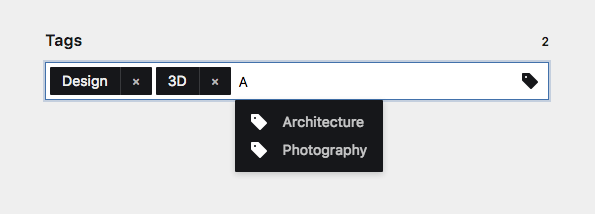
An interactive tags input field with autocompletion
The tags field is perfect for multiple variable options, which should be stored in a single field. It comes with built-in autocompletion for options and an intuitive interface for adding and removing multiple tags.

Example
fields:
  tags:
    label: Tags
    type: tags
Field properties
| Name | Type | Default | Description |
|---|---|---|---|
| accept | all |
If set to all, any type of input is accepted. If set to options only the predefined options are accepted as input. |
|
| api | – | API settings for options requests. This will only take affect when options is set to api. |
|
| autofocus | bool |
– | Sets the focus on this field when the form loads. Only the first field with this label gets |
| default | – | Default value for the field, which will be used when a page/file/user is created | |
| disabled | bool |
– | If true, the field is no longer editable and will not be saved |
| help | – | Optional help text below the field | |
| icon | tag |
Changes the tag icon | |
| label | – | The field label can be set as string or associative array with translations | |
| layout | string |
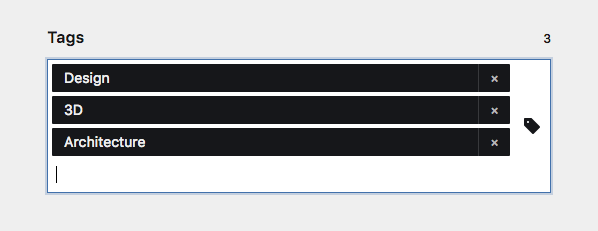
– | Set to list to display each tag with 100% width, otherwise the tags are displayed inline |
| max | int |
– | Maximum number of allowed entries/tags |
| min | int |
– | Minimum number of required entries/tags |
| options | [] |
An array with options | |
| query | – | Query settings for options queries. This will only take affect when options is set to query. |
|
| required | bool |
– | If true, the field has to be filled in correctly to be saved. |
| separator | string |
, |
Custom tags separator, which will be used to store tags in the content file |
| translate | bool |
true |
If false, the field will be disabled in non-default languages and cannot be translated. This is only relevant in multi-language setups. |
| when | – | Conditions when the field will be shown (since 3.1.0) | |
| width | string |
1/1 |
The width of the field in the field grid. Available widths: 1/1, 1/2, 1/3, 1/4, 2/3, 3/4
|
Autocomplete
For autocompletion to work, you need to set the options attribute. Options can be a fixed list (see below) or dynamic options using the query option.
fields:
  tags:
    label: Tags
    type: tags
    options:
      - Design
      - Architecture
      - Photography
      - 3D
      - Web
You can also define different value and text for options:
fields:
  tags:
    label: Tags
    type: tags
    options:
      - value: study/design
        text: Design
      - value: study/architecture
        text: Architecture
Dynamic options
Our options query syntax offers a very powerful way of converting pages, files, users, page values and even items in structure fields into automatically generated option lists.
Option queries
fields:
  category:
    label: Category
    type: tags
    options:
      type: query
      query: site.children.published
The example above will turn all published main pages of the site into options. The title of each page will be used as the text of the option and the page id will be used as the stored value.
A few more examples
query: site.children.template("project").limit(10)
query: page.images.offset(2)
query: users.filterBy("role", "admin").sortBy("name", "desc")
query: page.links.toStructure
You can start at the site, current page, users collection or the kirby instance to run your query. The result must be a collection of pages, files, users or a structure object
You can use array syntax and nested queries in Kirby's query syntax.
query: site.index.filterBy("template", "in", ["note", "album"]);
query: kirby.collection("some-collection").not(kirby.collection("excluded-collection"))
Getting options from all siblings or the index
query: page.siblings.pluck("tags", ",", true)
query: page.index.pluck("tags", ",", true)
query: site.index.pluck("tags", ",", true)
Custom text and value
To customize the displayed text or the stored value, you can be more specific when defining the query: text and value can be defined with the help of our string template language to get exactly what you want as the result.
category:
  label: Category
  type: tags
  options:
    type: query
    query: site.children.published
    text: "{{ page.year }}"
    value: "{{ page.slug }}"
As in the example above, all custom fields of a page can be accessed. You can even combine fields and use field methods:
category:
  label: Category
  type: tags
  options:
    type: query
    query: site.children.published
    text: "{{ page.year }} - {{ page.title.upper }}"
    value: "{{ page.slug }}"
Numeric keys
If you want to store numeric keys as values, you have to use the long notation with value and text:
fields:
  category:
    label: Category
    type: tags
    options:
      - value: '100'
        text: Design
      - value: '200'
        text: Architecture
Options from other fields
With a query it is not only possible to fetch options from pages, users, files or structure fields. You can also split comma-separated values of fields such as tags or checkboxes in order to create options from the result array.
category:
  label: Category
  type: tags
  options:
    type: query
    query: site.taxonomy.split
Of course you get the same flexibility with those array values, to modify the result text and stored value. Each item in the array will automatically be converted into an object with a key and value property. Those properties are regular Kirby content fields and you can use all field methods to work with them further. Items in the array need to be referenced as item
category:
  label: Category
  type: tags
  options:
    type: query
    query: site.taxonomy.split
    text: "{{ item.value.upper }}"
    value: "{{ item.value.slug }}"
A custom separator
If the values in a field are separated by something other than a comma, you can of course specify this as well in the query.
category:
  label: Category
  type: tags
  options:
    type: query
    query: page.categories.split(";")
Options from structure field
To fetch options from a structure field, you can use the toStructure method and then fetch the text and value from the fields of the structure items:
Assuming we have a structure field like this:
fediverse:
  label: Follow the Kirby Team in the fediverse …
  type: structure
  fields:
    name:
      label: Team Member
      type: text
    fediverse:
      label: Fediverse URL
      type: url
We can fetch the fields by using the keyword item:
contact:
  label: Contact person
  type: tags
  options:
    type: query
    query: site.contactoptions.toStructure
    text: "{{ item.name }}"
    value: "{{ item.fediverse }}"
Options via API
If the option queries are not enough or you need to pluck an external source for option data, you can use the API type.
category:
  label: Category
  type: tags
  options:
    type: api
    url: https://your-options-api.com/options.json
By default, the API type expects that the JSON endpoint returns an option array as shown above in the manual option setting.
You can be much more specific with the endpoint though and describe which kind of data to fetch and what to convert to text and value - pretty much as with the option queries.
A simple company list example
Let's assume that our JSON endpoint returns the following JSON:
{
  "Companies": [
    {"name": "Apple"},
    {"name": "Intel"},
    {"name": "Microsoft"}
  ]
}
As you can see, the format doesn't follow our expected option format at all. We first need to go down to the companies property and then somehow convert each company object into text and value for the options.
This can be done with our template language:
category:
  label: Category
  type: tags
  options:
    type: api
    url: https://example.com/companies.json
    query: Companies
    text: "{{ item.name }}"
    value: "{{ item.name.slug }}"
With the query attribute we can define where to start in the JSON document. This can even go down nested structures or sort entries:
query: Companies.sortBy("name", "desc")The JSON document is turned into a Kirby structure and thus can be queried and manipulated just like any other data within Kirby.
Afterwards the text and value setting can be modified by defining the template for each item.
Again, each item is being converted to a Kirby object and every property of the object is a typical Kirby field with all the available field methods. We can go pretty wild with this, if we want. Let's just assume we have a little bit more data for each company …
{
  "Companies": [
    {
      "name": "Apple",
      "products": [
        {"name": "MacBook"},
        {"name": "iPhone"},
        {"name": "iPad"}
      ]
    },
    {
      "name": "Intel",
      "products": [
        {"name": "Intel Core something"}
      ]
    },
    {
      "name": "Microsoft",
      "products": [
        {"name": "Windows"},
        {"name": "Hololens"},
        {"name": "Xbox"}
      ]
    }
  ]
}
value: "{{ item.name.slug.upper }}"
text: "{{ item.name }} - Products: {{ item.products.count }}"This would produce the following PHP array of options:
[
  value: 'APPLE',
  text: 'Apple - Products: 3'
],
[
  value: 'INTEL',
  text: 'Intel - Products: 1'
],
[
  value: 'MICROSOFT',
  text: 'Microsoft - Products: 3'
]
Dynamic API URLs
Instead of hard-coding an absolute URL into your blueprint, it's often better to have more control over the API URL. Especially when you are working with different environments (ie. local, staging, production)
The URL option of the API type can also be modified by using the string template language:
category:
  label: Category
  type: tags
  options:
    type: api
    url: "{{ site.url }}/my-api/companies.json"
    query: Companies
    text: "{{ item.name }}"
    value: "{{ item.name.slug }}"
With this simple addition, the API URL will always refer to the main URL of the site. You can also access the configuration instead to get even more flexibility
url: "{{ kirby.option('optionApiUrl') }}/companies.json"Translating options
You can provide different translations of your options' text that are shown depending on the user's Panel language:
options:
  summer:
    en: Summer
    de: Sommer
  autumn:
    en: Fall
    de: Herbst
  winter:
    en: Winter
    de: Winter
  spring:
    en: spring
    de: Frühling
Since 3.8.0
If you prefer to use custom language variables, you can do that via the * key:
options:
  summer:
    *: season.summer
  autumn:
    *: season.autumn
  winter:
    *: season.winter
  spring:
    *: season.spring
Limit input to options
Using the accept property, you can limit tag input to the query options:
tags:
    label: Tags
    type: tags
    accept: options
    options: query
    query:
       fetch: site.tags.split
Tags field layout
Tags can also be shown as a list using the layout property:
fields:
  tags:
    label: Tags
    type: tags
    layout: list
How to use in templates/snippets
A tags field stores all selected values in a comma separated list (value1, value2, value3) You can split this list with the split() method in your templates and then work with the result:
<ul>
  <?php foreach ($page->categories()->split() as $category): ?>
  <li><?= $category ?></li>
  <?php endforeach ?>
</ul>
If you use another separator than the default comma, you have to pass this separator to the split() method, for example when using | as separator:
<ul>
  <?php foreach ($page->categories()->split('|') as $category): ?>
  <li><?= $category ?></li>
  <?php endforeach ?>
</ul>
See $field->split() for more information.